Discord Clips: How to Create, Edit, and Share Clips in Discord
Learn how to use Discord Clips: enable, create, edit, save, and share clips from your streams. Find out about availability, Nitro requirements, and more.

Estimated reading time: 13 min
Key Takeaways
- Discord Clips lets users create, save, and share highlights from streams directly within Discord.
- You must enable Clips in User Settings; availability may depend on server, beta status, and Nitro eligibility.
- Clips can be created during streams using keyboard shortcuts or on-screen buttons, and can be edited before sharing.
- All saved clips are stored in your personal Clip Library for easy access and management.
- Clips are a powerful way to boost engagement and repurpose live content—AI tools like Vidulk can further automate viral clip creation.
Table of Contents
- Section 1: What Are Discord Clips and How Do They Work?
- Section 2: Enabling Discord Clips in User Settings
- Section 3: Creating Clips While Streaming on Discord
- Section 4: Clip Length, Save Location, and Clip Library Explained
- Section 5: Sharing and Editing Discord Clips in Text Channels
- Section 6: Availability, Beta Status, and Nitro Requirements
- Conclusion
- FAQ
Section 1: What Are Discord Clips and How Do They Work?
Overview of Discord Clips
Discord Clips is a powerful feature designed to let users capture, save, and share short highlights from live streams or video calls within Discord. With the rise of streaming and content creation, moments that deserve to be remembered or shared often happen spontaneously. Discord Clips bridges this gap, allowing participants to instantly create clips of memorable moments, discussions, or gameplay without needing external software.
Unlike traditional screen recording tools, Discord Clips is natively built into the Discord interface, which means users do not need to install separate software or deal with complicated export processes. Clips are created with a single click or keyboard shortcut and are instantly accessible for review or sharing, streamlining the content creation process for everyone from casual users to professional streamers.
Core Functionality
- Instantly capture moments: At any time during a stream or video call, users can create a clip of the previous 30-120 seconds, depending on the preset. This retrospective capture approach means you don't have to anticipate when a highlight will occur—you simply grab it after it happens, ensuring you never miss a memorable moment.
- Accessible clip library: All clips are organized in a user-friendly library within Discord, making it easy to revisit, manage, or share them later. The Clip Library serves as a central hub, showing thumbnail previews, clip durations, and the date/time each was captured.
- Direct sharing: Clips can be quickly posted to any eligible text channel or sent to friends, streamlining content sharing within the Discord ecosystem. Sharing is as simple as selecting a clip and clicking a button, reducing friction for both creators and their community.
Why Discord Clips Matter for Creators
For content creators, Discord Clips offer a seamless way to boost engagement, capture viral moments, and repurpose live content. Instead of relying on third-party screen recorders, creators can now empower their communities to highlight and amplify the best parts of their streams. This feature also paves the way for collaborative content curation and community-driven highlights.
Consider a scenario where a streamer lands a difficult in-game trick or a hilarious conversation takes place during a group call. With Discord Clips, not only can the streamer capture and share that moment instantly, but viewers and moderators can also contribute by clipping their favorite moments. These clips can then be shared on social media, compiled into "best of" highlight reels, or even used in promotional material, extending the reach and lifespan of live content well beyond the original broadcast.
For advanced AI-powered clipping and vertical video creation, tools like Vidulk automate the process, making it even easier to turn long-form video or audio into shareable, viral-ready clips. Vidulk, for example, can analyze streams to automatically find engaging moments, add captions, and optimize the output for social media platforms like TikTok, Instagram Reels, and YouTube Shorts—saving creators hours of manual editing.
Overall, Discord Clips represents a major step forward in content democratization, enabling both creators and their communities to collaboratively curate and promote the best moments from every session.
Section 2: Enabling Discord Clips in User Settings
Where to Find the Discord Clips Setting
Before you can start creating Discord Clips, you need to enable the feature in your user settings. Note that the option may only be visible in servers where Clips is available, and for users who meet certain eligibility requirements (such as being a Nitro subscriber or participating in the beta).
- Click the gear icon near your username to open User Settings.
- Navigate to the "Clips" section (typically under the "Activity Settings" or "Streamer Mode" tab, depending on your app version).
- Toggle the Enable Clips option to on. You may be prompted to review or accept Discord's terms for using Clips, especially if you are in a server with custom rules or moderation settings.
It's also worth noting that the Clips option will only appear if the server admin has enabled the feature for that specific server, and if Discord has rolled out the feature to your account or region. If you do not see the option in your settings, you may need to check your eligibility or wait for broader rollout.
Server and Channel Requirements
Not all servers or channels support Discord Clips. Server admins can enable or restrict Clips in server settings. If you don't see the option, check:
- Whether your server is part of the Clips beta. Only select servers are initially granted access to test and provide feedback on new features during phased rollouts.
- If you have the necessary permissions (some servers limit Clips to certain roles, such as moderators or streamers). For example, a gaming server might allow only verified streamers or community leaders to create and share clips to prevent spam.
- That you are using the latest Discord desktop or mobile app version. Feature availability is often tied to recent updates, so older versions may not support Clips.
Admins can also set certain channels as "Clip-enabled," meaning only conversations and streams within those specific channels can be clipped. This allows server owners to maintain control over what content can be clipped and shared, helping to enforce privacy or content guidelines as needed.
Troubleshooting Enablement Issues
If you can’t find or enable Clips:
- Update your Discord app to the latest version from the official website or app store. Many feature rollouts are tied to app updates.
- Restart Discord after changing settings to ensure all features are loaded correctly.
- Ask your server admin if Clips is enabled for your server or your user role. If you’re an admin, double-check server settings under "Integrations" or "Community Settings" to verify if Clips is toggled on for members.
If you've checked all the above and still don't see the Clips feature, it's likely that Discord hasn't rolled it out to your account or region yet. Monitor Discord’s official blog and your server’s announcements for updates. For more on integrating video functionality into your content workflow, check out this guide on how to integrate a video chat API for seamless content creation.
Section 3: Creating Clips While Streaming on Discord
Using Keyboard Shortcuts (Alt+C)
Discord makes it easy to create clips in real time while streaming or in a video call. The most common method is the default keyboard shortcut:
- Press Alt + C (on Windows) during a stream to instantly capture the most recent segment (length is set in your settings).
- For Mac users, the shortcut may differ or require customization in settings. Typically, you can set a global shortcut in the Discord app preferences, for example, Option + C.
This feature ensures that you never miss a key moment, even if it just happened—no need to anticipate or pre-record. For example, if you land an incredible killstreak in a game or someone cracks a hilarious joke on call, simply hit the shortcut and Discord will retroactively capture that segment.
Power users may want to rebind the shortcut to an unused key combo to avoid conflicts with in-game controls. You can do this under User Settings → Keybinds, then add "Create Clip" as a custom action. This is especially useful for creators who want to capture gameplay without minimizing or tabbing out of their main window.
Using the Save Clip Button
When you're streaming, Discord displays a small "Save Clip" button overlay on the stream window:
- Click the Save Clip button at any time to create a new clip. The overlay is typically positioned in a non-intrusive corner of the stream window so it doesn't block gameplay or video content.
- The button is only visible to eligible users (based on server and account status). If you don't see it, double-check your settings and server permissions.
This visual option is perfect for streamers who prefer not to use keyboard shortcuts or who are multitasking. It also serves as a reminder that the clipping feature is active during your session.
Best Practices for Capturing Memorable Moments
- Decide on your default clip length before starting your stream (30, 60, 90, or 120 seconds). Shorter clips are easier to share and consume, while longer clips provide more context.
- Communicate with your audience—let them know they can also create clips if enabled. This not only increases engagement but allows your fans to curate the best moments from their perspective.
- Use clips to highlight epic wins, funny fails, or important discussions. For example, if you're running a Q&A session and a particularly insightful answer is given, clip it for future reference or social sharing.
- Regularly review your clips after each session to identify standout moments for highlight reels or promotional material. Consistent curation helps build a library of content that can be repurposed across platforms.
For creators aiming to optimize their workflow and automate the viral clip process, AI tools like Vidulk can further streamline the transformation of long-form streams into engaging, shareable content. Vidulk’s AI can automatically flag high-engagement moments (based on chat reactions, volume spikes, or facial expressions), making the clipping process even more efficient and targeted.
Section 4: Clip Length, Save Location, and Clip Library Explained
Adjusting Clip Length Options
Discord lets users customize the length of their clips to suit their needs. The available durations typically include:
- 30 seconds (default for quick highlights)
- 60 seconds
- 90 seconds
- 120 seconds (maximum length)
To set your preferred length:
- Go to User Settings → Clips
- Choose your default clip duration. You can change this setting any time, even during a stream, to adapt to different types of content (for example, using shorter clips for fast-paced games and longer clips for talk shows).
Keep in mind that shorter clips are more likely to go viral on social media due to their quick, attention-grabbing nature, while longer clips may be better for context or in-depth moments.
Where Are Discord Clips Saved?
Once you create a clip, Discord saves it to your personal Clip Library. This dedicated section acts as a hub for all your recorded highlights, making it easy to browse, manage, or delete clips. The library is cloud-based—clips are not saved to your local computer by default unless you choose to download them.
- Access your Clip Library from the Clips section in User Settings or via the dedicated sidebar tab (if available). In some Discord updates, the Clip Library appears as a separate icon in the left sidebar for quick access.
- Clips are organized by date, stream, or channel for easy navigation. You can sort them by most recent, longest duration, or even by which clips have been shared the most.
- Each clip entry typically includes a thumbnail, duration, timestamp, and an option to edit, share, or delete. You can also see which channel or server the clip originated from, which is helpful for managing content across multiple communities.
Clips remain in your library until you delete them or until they expire, if your server has set retention policies. Some servers may limit how long clips are stored to manage storage costs or privacy concerns.
Saving Clips Locally
To save a Discord clip to your computer:
- Open the desired clip in your Clip Library.
- Click the Download or Save As button. The file is typically in MP4 format, making it easy to edit or upload to other platforms.
- Choose your preferred file location (e.g., Desktop, Videos folder). You can rename the clip file to something memorable or descriptive.
Local downloads are especially useful if you want to further edit your clip in external software, archive it for long-term use, or share it outside of Discord (for example, uploading to YouTube, TikTok, Twitter, or Instagram).
Screenshot: Vidulk Video Editing Screen
For creators seeking advanced editing and viral optimization, the Vidulk app provides an intuitive video editing interface with powerful clip tools:
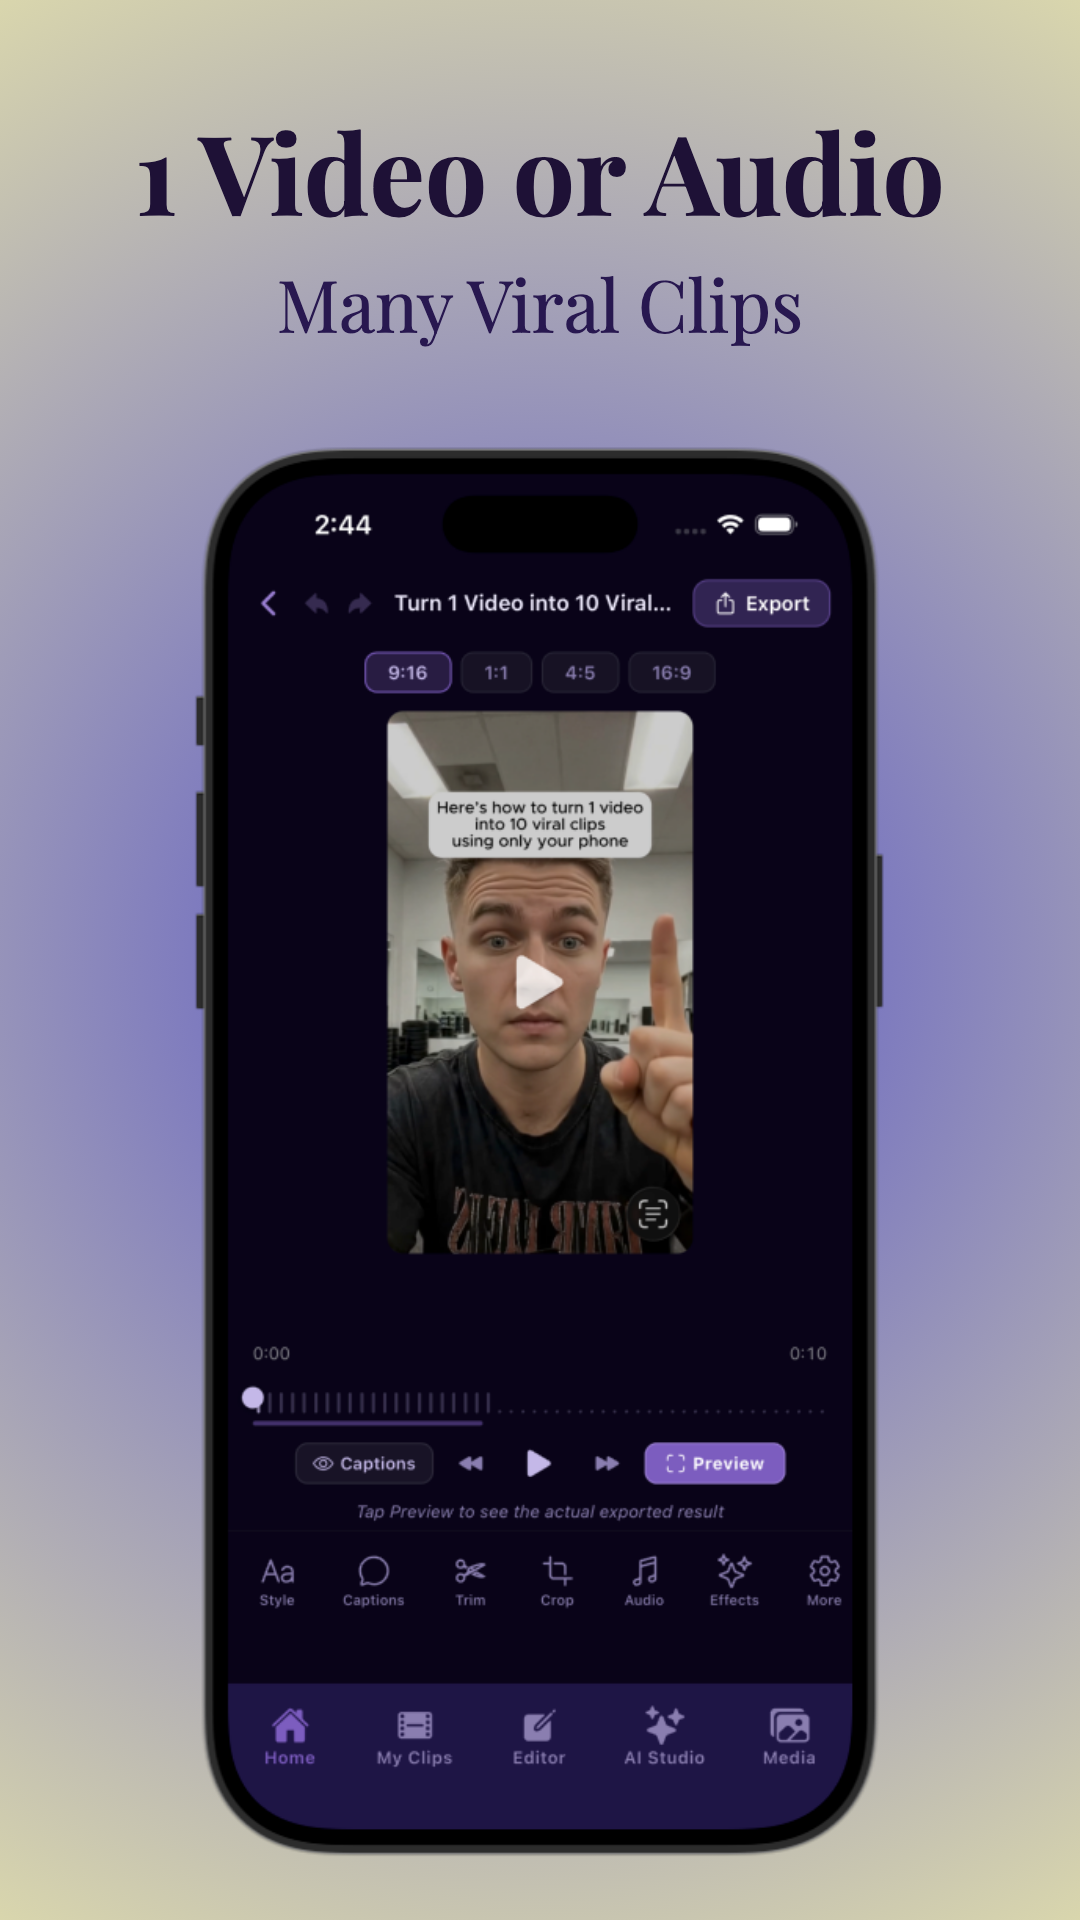
With Vidulk, you can automatically transcribe, caption, and format your Discord clips for vertical video platforms, add branding or watermarks, and even generate highlight reels with AI. These features are ideal for creators looking to maximize the reach and impact of their content beyond the Discord ecosystem.
Section 5: Sharing and Editing Discord Clips in Text Channels
How to Share a Discord Clip
Once you've created or selected a clip, sharing it in a text channel is straightforward:
- Open your Clip Library and select the clip you want to share.
- Click the Share button. You may also see an option to copy a direct link to the clip for sharing outside Discord, depending on the server’s privacy settings.
- Choose the target text channel or direct message. Only channels with appropriate permissions will appear as options.
- Add an optional message or description, then send. You can give context, tag friends, or start a discussion around the clip.
The clip will appear in the channel as an embedded video, allowing members to watch it instantly. Users can react, comment, or even re-share the clip within the server, sparking conversation and increasing engagement.
Some servers have dedicated #clips, #highlights, or #best-moments channels specifically for sharing these types of videos. This helps keep content organized and easily discoverable for new or returning members.
Editing or Trimming Clips Before Sharing
Discord includes basic editing tools for clips:
- Trim start/end points: Use the slider to cut out unnecessary footage from the beginning or end of your clip. This is useful for removing dead air, loading screens, or any irrelevant content.
- Add captions or notes: In some versions, you can add text overlays before sharing. This can include context for the clip, funny captions, or important timestamps.
- Preview: Always preview your clip to ensure it captures the intended moment. The preview window allows you to watch the trimmed and captioned version as it will appear to others before finalizing your share.
For creators needing more advanced editing, automated captioning, or viral formatting, see this post on how to use an AI clip generator to transform long videos into viral shorts. Tools like Vidulk can add dynamic subtitles, branded intros/outros, and even suggest which moments are most likely to perform well on social media.
Best Practices for Sharing Clips
- Share highlights in dedicated #clips or #highlights channels for visibility. This makes it easier for community members to discover and engage with the best moments from your streams.
- Tag relevant users or roles to boost engagement. For example, tag the people featured in the clip or notify moderators when a highlight is particularly impressive or worthy of server-wide attention.
- Encourage your community to create and share their own clips. Community-driven clipping can uncover moments you might not have noticed and helps foster a sense of participation and belonging.
- Respect privacy and content guidelines—avoid sharing sensitive or private moments without consent, and always comply with server rules about what can be clipped and shared.
- Regularly feature the best clips in server announcements, highlight reels, or even on external social media accounts to spotlight community contributions and increase server visibility.
Section 6: Availability, Beta Status, and Nitro Requirements
Is Discord Clips Available to Everyone?
As of early 2024, Discord Clips is still rolling out in stages. Availability depends on several factors:
- Beta participation: Clips may only be enabled in select servers that are part of the beta program. These servers are chosen by Discord to test new features, gather feedback, and identify bugs before a wider release.
- Nitro subscription: In some cases, Clips is initially available to Discord Nitro users as a premium feature. Nitro subscribers often get early access to new tools and features, allowing Discord to reward their most dedicated users and gather feedback from a tech-savvy audience.
- Server settings: Server admins must enable Clips for their community; otherwise, the feature remains hidden. This ensures that communities retain control over what media tools are active on their servers.
Discord's phased rollout strategy helps manage server load and address any technical or moderation challenges before the feature is made widely available. This approach also allows Discord to fine-tune feature sets based on real user feedback from diverse communities.
How to Check Your Eligibility
If you're unsure whether you can access Discord Clips, try the following:
- Look for the Clips section in your User Settings. If it's not visible, the feature may not be available in your region, server, or account tier yet.
- Check if your server admin has enabled the feature. If you’re a server owner or admin, you can enable Clips under Server Settings → Integrations or Community Features.
- Verify if you're a Nitro subscriber (if required for your region or server). Nitro users can check their subscription status under User Settings → Nitro.
- Join official Discord servers or check community forums/announcements for updates on feature rollouts and beta invitations.
Discord has plans to expand Clips availability, but for now, the rollout is controlled and may not reach all users immediately. If you don’t have access yet, keep your app updated and stay active in Discord’s feedback channels for the latest news.
Alternatives if Clips Is Not Available
If you don’t have access to Discord Clips, consider using third-party tools or AI-powered apps like Vidulk to generate short, shareable video clips from your streams or podcasts. Vidulk leverages AI to automatically detect the best moments, add captions, and format clips for platforms like TikTok, Instagram, and YouTube Shorts.
For example, a creator can upload a full-length stream to Vidulk, and the AI will scan for high-energy segments, key phrases, or audience reactions. Within minutes, you receive multiple short clips, each optimized for a different platform—including vertical video formatting, branded overlays, and eye-catching captions.
For a practical guide on making AI video clips outside of Discord, see this step-by-step tutorial on making AI video clips. This workflow is especially valuable for creators who want to maintain a strong presence across multiple social networks without spending hours editing each piece of content by hand.
Conclusion
Discord Clips is transforming the way creators and communities capture and share the best moments from streams and video calls. With built-in tools for instant clipping, editing, and sharing, the feature is ideal for fostering engagement and building highlight reels directly within Discord. While currently limited to certain servers and users (with some requirements for Nitro or beta participation), Clips is expected to expand over time.
As Discord continues to iterate on and expand the Clips feature, it’s likely we’ll see deeper integrations with other Discord tools, more granular editing options, and broader availability across regions and account types. Clips not only make it easier to create a culture of shared highlights within your community but also open up new possibilities for cross-platform promotion, community events, and collaborative content curation.
If you’re looking to supercharge your content workflow or automate the creation of viral-ready clips, consider exploring AI-powered solutions like Vidulk. By combining Discord’s native clipping features with advanced AI tools, content creators can maximize reach, repurpose long-form video, and keep their communities engaged across all major platforms.
Whether you’re a streamer, a community manager, or just someone who wants to preserve great moments with friends, Discord Clips is a feature worth exploring. Stay tuned for further updates as Discord continues to develop new ways to empower its users and creators.
FAQ
Q: How do you turn on Clips in Discord?
A: Go to User Settings, find the "Clips" section, and toggle "Enable Clips". If you don't see the option, your server may not have Clips enabled, or you may not be eligible yet.
Q: How do you clip a moment on Discord while streaming?
A: Press Alt+C (or the relevant shortcut on your system) during a stream, or click the "Save Clip" button overlay. The clip will capture the previous 30-120 seconds, depending on your settings.
Q: Where are Discord clips saved on my computer?
A: By default, Discord clips are saved to your cloud-based Clip Library within Discord, not your local computer. You can download clips manually to your device if needed.
Q: How do you share a Discord clip in a channel?
A: Open your Clip Library, select the clip, click "Share", and choose the target text channel. Add an optional message and post the clip directly in Discord.
Q: Is Discord Clips available to everyone or only Nitro users?
A: Discord Clips is in beta and not yet available to everyone. Some servers and users (such as Nitro subscribers) may get early access, but wider rollout is expected in the future.
Q: Can you edit a Discord clip before posting it?
A: Yes, Discord allows basic editing, such as trimming the start and end points and adding captions or notes before sharing a clip in a channel.