How to Clip Discord Videos for Socials: The Complete Guide
Learn how to clip Discord videos for socials, set up Discord Clips, edit, trim, and repurpose moments for TikTok, Reels, Shorts, and more with AI tools.

Estimated reading time: 14 min
Key Takeaways
- Learn how to enable, capture, and edit Discord Clips for social media sharing.
- Understand best practices for capturing viral moments from Discord streams and calls.
- Master workflows to turn Discord clips into vertical videos with captions for platforms like TikTok, Reels, and Shorts.
- Discover how AI tools like Vidulk streamline the process of repurposing long Discord recordings into multiple social-ready clips.
Table of Contents
- Section 1: Enabling Discord Clips and Setting Up
- Section 2: How to Capture Clips in Discord
- Section 3: Editing and Managing Your Discord Clips
- Section 4: Top Moments to Clip for Social Media Impact
- Section 5: Turning Discord Clips into Social-Ready Videos
- Section 6: Advanced Workflows for Repurposing Discord Content
- Conclusion
- FAQ
Section 1: Enabling Discord Clips and Setting Up
Prerequisites for Discord Clips
Before you can clip Discord videos for socials, you need to ensure your setup supports Discord Clips. This feature is available in Discord's desktop app and may be rolled out gradually. It's designed for users who stream or share their screens in voice or video calls.
- Streaming or Screen Sharing: You must be actively streaming or screen sharing for the Clips feature to work. Clips cannot be created from regular voice calls without an ongoing stream.
- Latest Discord Version: Make sure you're running the latest version of the Discord app. Update if necessary.
On some systems, especially if you’re on Windows 7 or macOS versions before Catalina, Discord Clips may be unavailable or limited. Always check for operating system compatibility in Discord’s official documentation to avoid issues.
For users managing remote teams or communities, note that Discord Clips are currently not available on the web or mobile apps. You’ll need to use the desktop client for full functionality.
Enabling Clips in User Settings
To start, you need to explicitly enable the Clips feature:
- Go to User Settings > Clips.
- Toggle Enable Clips to ON.
- Set your preferred clip length (usually 15, 30, or 60 seconds).
- Assign a hotkey for quick clipping (default: Alt+C).
Once enabled, you’ll see the Save Clip button when streaming or sharing video.
Choosing the right clip length is important. For fast-paced gaming highlights or reaction shots, 15 seconds may suffice. For storytelling, reveals, or longer payoffs, 30–60 seconds is ideal. You can change the default length at any time, but remember: shorter clips tend to perform better on platforms like TikTok and Shorts.
Assigning a hotkey that’s unique and easy to reach (e.g. Alt+Shift+C) prevents accidental overwrites and ensures you never miss a moment. Test your hotkey in a private call to confirm it works as expected.
Permissions and Server Settings
Server admins can control who can create clips. If you can’t access clipping, check with your server’s permissions under Server Settings > Roles > Video Permissions.
- Clipping may be restricted in private servers or calls for privacy reasons.
- Always inform participants if you plan to capture and share clips.
Some servers may have additional bots or moderation tools that restrict recording or streaming. If you receive errors or notification pop-ups when attempting to clip, review your server’s rules and consult with the admin. It’s good etiquette to post a brief message before recording: “Clips may be taken from this session for social content. Let me know if you’d like to opt out.” This helps maintain trust and avoids privacy complaints later.
Be aware that Discord’s Terms of Service and community guidelines apply; sharing sensitive or private conversations without consent can result in penalties or bans.
Section 2: How to Capture Clips in Discord
Using the Save Clip Button
When streaming or on a video call, Discord displays a Save Clip button in the lower right. Clicking this instantly saves a clip based on your preset length.
- Default clip length (e.g., 30 seconds) determines how much of the recent stream is saved.
- Clips include both video and audio from the stream.
For example, if you’re streaming a game and a funny moment happens, clicking Save Clip will retroactively capture the last 30 seconds (or your set length) of both video and audio—no need to anticipate moments in advance. This is especially useful for reaction clips or unexpected highlights.
If you’re sharing your screen during a tutorial or demonstration, use the Save Clip feature to quickly preserve key teaching moments for later repurposing. For detailed AI-powered workflows to turn long videos into short clips, see How to Turn Long Videos Into Short Clips: The Complete AI Workflow.
Using the Alt+C Shortcut
For speed, use the Alt+C hotkey (or your custom assignment) during a stream. This is ideal for capturing spontaneous moments without fumbling for the mouse.
- Press Alt+C anytime during a stream or video call to save the last N seconds.
- If you change the hotkey, ensure it doesn’t conflict with other system shortcuts.
Advanced users can map the clip shortcut to a macro pad, Stream Deck, or gaming keyboard for even faster access. This is popular among streamers who need to capture multiple highlights during long sessions.
Where to Find Saved Clips
After capturing, clips are stored locally on your computer:
- Default location: Videos > Discord Clips (Windows) or Movies > Discord Clips (Mac).
- You can change this folder in User Settings > Clips.
From here, you can preview, edit, or share your saved moments.
Clips are named by date and time for easy sorting (e.g., discord-clip-2024-06-05-14-30-12.mp4). For heavy users, organizing clips into subfolders by event or topic helps streamline post-production. If you use cloud sync tools like OneDrive or iCloud Drive, consider syncing your Clips folder for easy access across multiple devices.
Be mindful of disk space if you record long sessions; each minute of 720p video can consume 50–100MB depending on audio and video quality settings. Regularly review and delete unwanted clips to keep your storage optimized.
Section 3: Editing and Managing Your Discord Clips
Trimming and Editing Inside Discord
Discord now offers basic in-app editing for your clips before you share them:
- Trim: Adjust the start and end points to capture exactly what you want.
- Title: Add a custom title for clarity and context.
- Audio Toggle: Mute or unmute audio as desired.
- Spoiler Marking: Mark a clip as a spoiler for sensitive content.
- Delete: Remove unwanted clips directly from the app.
These features help you quickly clean up clips before further editing or posting.
Suppose you capture a 60-second segment but only want to showcase a 20-second joke or reaction. Use the trim handles to select the perfect in and out points. Add a descriptive title like “Epic Fail Reaction” to make finding the clip easier later, especially if you’re batch-processing multiple highlights.
If your clip contains background noise or a private conversation, toggle the audio or use the spoiler feature to mark it as sensitive—this is critical for maintaining professionalism and respecting privacy.
Sharing Clips in Discord Chat
To share a saved clip:
- Click the + icon in any chat and select your clip from the local folder.
- Add a caption or tag friends before sending.
- Use spoiler or content warnings if sharing in public servers.
When sharing, consider your audience. For private friend groups, casual captions and inside jokes work well. For public servers or community channels, provide context and avoid in-jokes that might confuse new viewers. Tagging relevant users can boost engagement and encourage reactions.
For large communities, consider pinning especially good clips to the relevant channels or creating a #highlights channel for easy access. This helps new members catch up on the best moments and fosters a sense of community.
Exporting Clips for Social Media
For TikTok, Instagram Reels, or YouTube Shorts, you’ll need to convert and optimize clips. Discord exports in standard video formats, but additional edits are often necessary for viral potential.
Most Discord clips export as MP4 files with 16:9 aspect ratio. Social platforms prefer vertical (9:16) videos for mobile viewing. Before uploading, use a video editor to rotate, crop, or resize your clip. Free tools like CapCut, DaVinci Resolve, or even mobile apps can help, but AI-powered platforms like Vidulk automate this process with better results and fewer steps. For a comprehensive overview of AI video tools that assist creators with clipping and captions, check out AI Video Tools for Creators: The Ultimate Guide to Clipping, Captions & More.
Remember to check each platform’s video requirements for maximum length, file size, and aspect ratio. For example, TikTok allows up to 10 minutes but recommends under 60 seconds for best engagement; Instagram Reels maxes out at 90 seconds; YouTube Shorts must be under 60 seconds and vertical.
Section 4: Top Moments to Clip for Social Media Impact
Identifying Viral Moments in Discord Streams
Not every moment is clip-worthy. For social platforms, focus on:
- Hooks: Start with an intriguing question or bold statement to grab attention.
- High-Payoff Moments: Capture punchlines, epic fails, major reveals, or emotional reactions.
- Clear Audio and Visuals: Ensure both are crisp for maximum engagement.
For example, if you’re running a Q&A session, clip the most surprising or controversial answer. In gaming streams, focus on clutch plays, funny glitches, or team celebrations. For community discussions, highlight heated debates, group laughter, or heartwarming stories.
Pay attention to audience reactions in chat or on voice—if several people are laughing or typing “OMG,” that’s a good sign you’ve hit a viral moment. Rewatch your stream and look for spikes in chat activity to identify potential highlights.
Clipping from Group Calls and Video Events
Discord group calls, AMAs, and watch parties can yield gold. Look for:
- Organic, unscripted reactions
- Funny or insightful exchanges
- Memorable comments or debates
Time-stamped notes during sessions help you quickly locate the best bits later.
For example, during a group movie night, note the timestamp when everyone bursts into laughter or when someone makes a witty comment. If you’re hosting a podcast with multiple guests, use time markers for each guest’s strongest soundbite. Some creators keep a shared Google Doc open for moderators or co-hosts to jot down highlights in real time.
When reviewing a long call, look for moments where multiple people are animated, use hand gestures, or react strongly—these are typically more engaging than solo monologues.
Using AI and Tools for Clip Selection
Apps like Vidulk use AI to scan long-form Discord recordings and auto-detect the most engaging moments, saving you hours of manual review. This is especially valuable if you record entire podcasts or community calls.
Vidulk analyzes speech patterns, keyword density, and emotional tone to flag moments with the highest viral potential. For example, it might highlight the 20-second span where the phrase “I can’t believe that happened!” is repeated by multiple speakers, or where audience laughter peaks. This takes the guesswork out of manual scrubbing and ensures you never miss a highlight.
Learn more about using AI to transform long videos into viral clips in our post AI Clip Generator: Transform Long Videos Into Viral Shorts.
Section 5: Turning Discord Clips into Social-Ready Videos
Editing for Social Platform Requirements
Social platforms each have unique requirements for video clips:
- TikTok, Reels, Shorts: Vertical (9:16) format, 15-60 seconds, captions and dynamic visuals.
- Twitter/X, Facebook: Square or landscape formats also supported, but verticals tend to perform better for mobile users.
Most Discord clips are landscape (16:9). You’ll need to convert to vertical and add overlays or captions for best results.
For example, if your original Discord clip is 1920x1080 (16:9), use cropping tools to focus on the main speaker or action. Center the webcam view or reaction, and fill the top/bottom areas with branded graphics, blurred backgrounds, or moving subtitles. This approach, often called "pillarboxing," prevents awkward cropping and keeps the content visually engaging.
Consider the platform’s culture too: TikTok rewards fast pacing, meme captions, and quick cuts, while YouTube Shorts may benefit from longer, story-driven clips. Tailor your editing style to match the audience’s expectations.
Using AI-Powered Editing Tools
Apps like Vidulk let you upload Discord clips or paste links to longer recordings. Their AI automatically:
- Detects and extracts the best moments
- Resizes and crops to 9:16 vertical format
- Adds dynamic, stylized captions
- Lets you choose cover frames and adjust color/tone
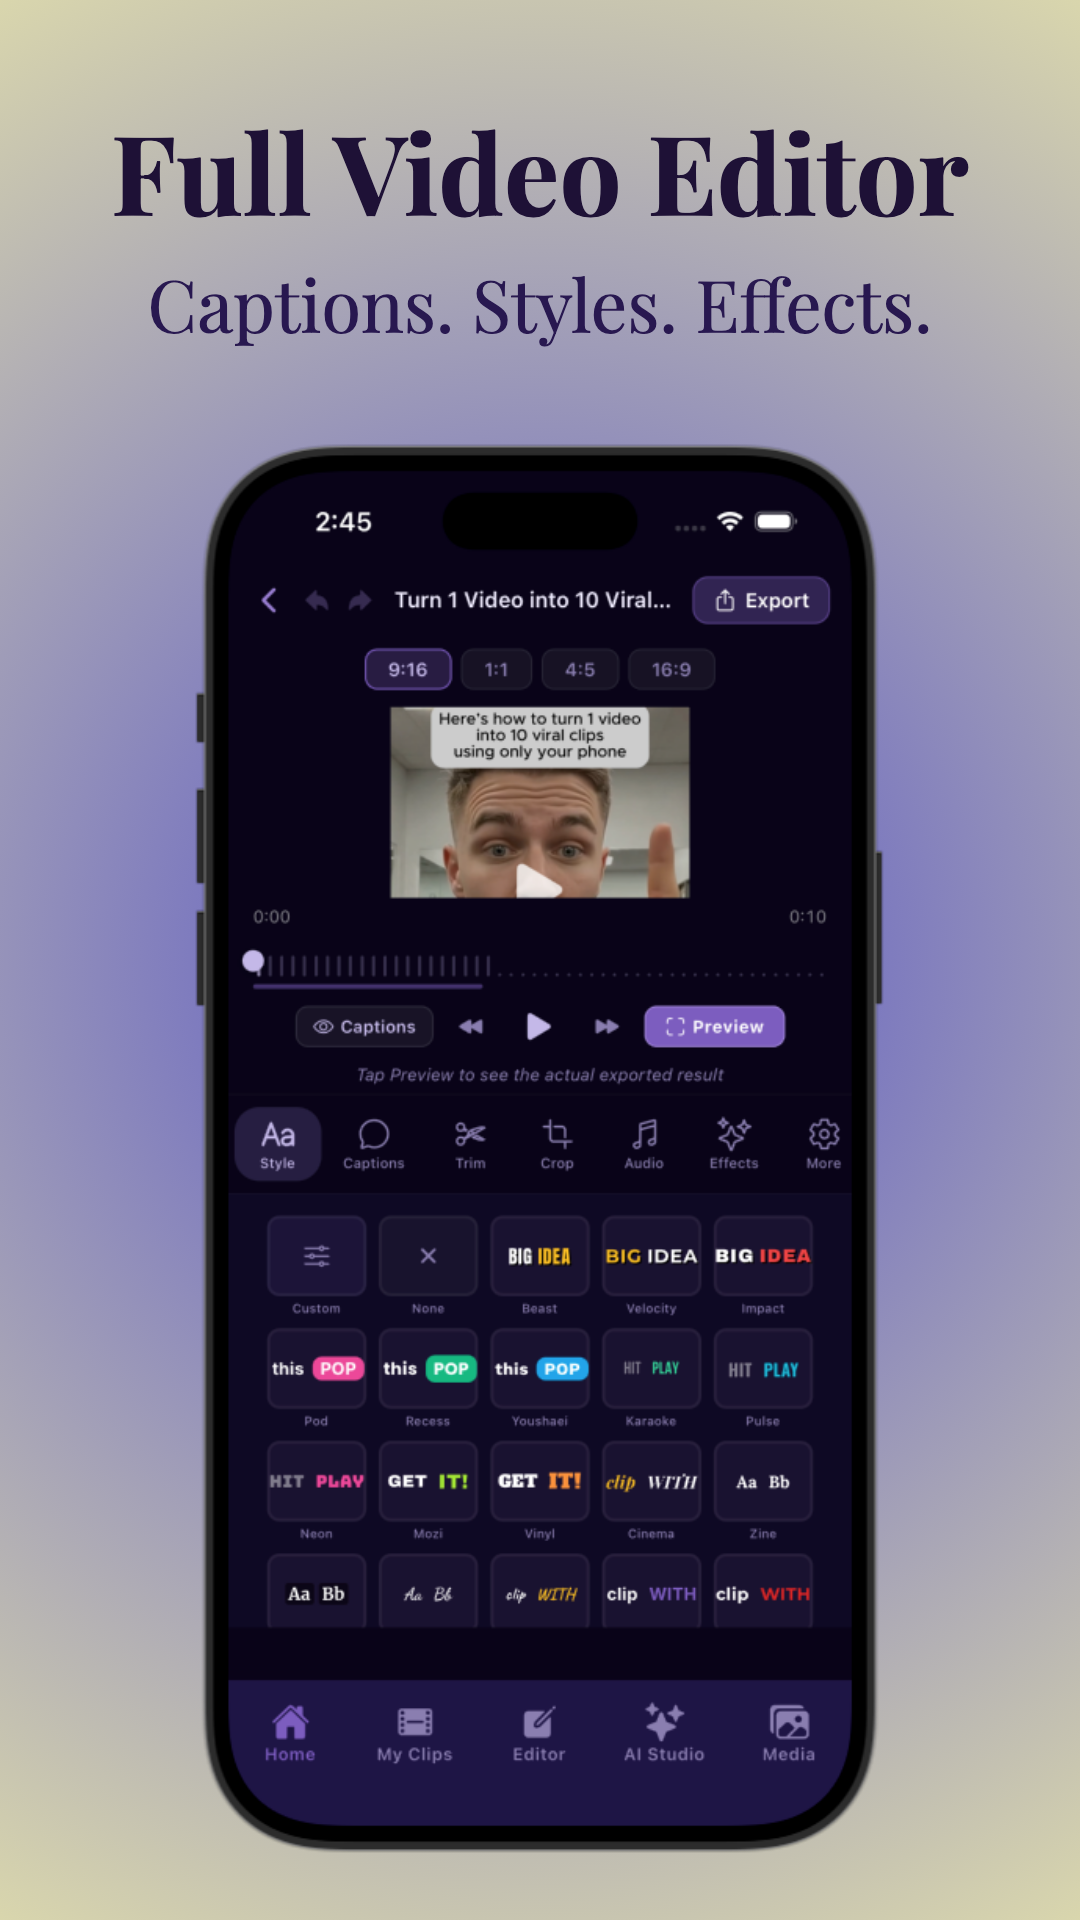
This streamlines the process of going from raw Discord footage to a polished, share-worthy short.
For instance, after uploading your Discord MP4, Vidulk’s AI scans for high-energy or emotionally charged segments. You can preview each suggested clip, fine-tune the in/out points, and select a vertical crop that highlights the speaker’s face or key action. Built-in captioning tools transcribe the audio and let you customize font, color, and animation style for each line. You can also apply color grading presets or add your channel’s watermark with a single click.
This workflow saves hours compared to manual editing, especially when processing dozens of clips per week. For creators and brands, automating these steps means you can focus on content, not editing headaches. For a detailed guide on converting videos to shorts with AI tools, see The Ultimate Video to Shorts Converter Guide: AI Tools, Features, and Workflow.
Captions, Covers, and Viral Enhancements
Captions are essential for social clips since most viewers watch with the sound off. Use bold, legible fonts and highlight key words for emphasis.
- Choose a compelling cover frame for higher click-throughs.
- Add emojis, text overlays, or branded elements to reinforce your channel identity.
For each clip, review the automatically generated captions for accuracy—AI is good, but not perfect. Edit any misheard words, add emphasis with color or boldface, and consider splitting longer lines for better readability on mobile.
To increase click-through rates, choose a freeze-frame that shows a strong reaction, funny face, or big moment; this will be the thumbnail/cover on platforms like TikTok and Reels. Use overlays like “WAIT FOR IT…” or “Best Moment!” to tease the content and boost engagement.
For more advanced captioning and vertical video tips, check out AI Video Clip Generator: Transform Long Videos with AI.
Section 6: Advanced Workflows for Repurposing Discord Content
Clipping from Long Discord Recordings
If you host long video calls, podcasts, or events on Discord, you may want to create multiple short clips for different platforms. Here’s how:
- Record the entire session using Discord’s built-in stream recording or third-party tools.
- Download the video file (typically .mp4 or .mov format).
- Upload to an AI-powered editor like Vidulk, which will auto-select and suggest highlight moments for you.
For example, after a two-hour Discord AMA, you can upload the full recording to Vidulk. The AI scans for spikes in laughter, applause, or keyword mentions (“giveaway,” “announcement,” etc.) and suggests 10–20 highlight reels. This is invaluable for podcasters, educators, or community managers who want to maximize content output from each session.
Some creators use a combination of tools: OBS or Discord’s built-in recorder for session capture, then cloud storage (Google Drive, Dropbox) for easy upload to editing platforms. For privacy and security, always inform participants if you plan to record and clip, and store raw files securely.
Batch Editing and AI Assistance
Instead of manually scrubbing through hours of footage, AI tools analyze speech, sentiment, and engagement cues to generate multiple short clips in one go. This is a game-changer for creators who want to maximize content output from each Discord event.
- Auto-generate 5–20 clips from one hour-long Discord call.
- Customize, trim, and caption each clip according to your social strategy.
With Vidulk or similar tools, you can tag and sort generated clips by topic, speaker, or emotional tone. For example, group all “funny moments” together for TikTok, and save “insightful advice” clips for LinkedIn or YouTube. Bulk-export features let you render all selected clips in the correct aspect ratio and resolution for each platform in one batch, saving even more time.
For a step-by-step workflow, see How to Post More Content and Grow: The Ultimate Repurposing Guide.
Cross-Posting and Scheduling Social Clips
Once your Discord clips are ready:
- Export in the ideal format for TikTok, Reels, Shorts, or Twitter.
- Use scheduling tools (like Later, Buffer, or native platform tools) for regular posting.
- Monitor engagement and adjust your content strategy based on what resonates.
Consistency is key: aim to post at least 3–5 clips per week for steady growth. Scheduling tools help you space out posts and target peak engagement times on each platform (e.g., evenings for TikTok, lunch hours for Instagram Reels). Consider repurposing the same clip in different formats: a 60-second vertical for TikTok, a 30-second square for Facebook, and a subtitled GIF for Twitter.
Track performance metrics like watch time, shares, and comments. Use analytics to identify your strongest clips, then double down on similar content in future Discord sessions. Encourage your community to suggest moments to clip—this fosters engagement and helps surface the best highlights.
By leveraging AI-powered workflows, you can turn every Discord session into a dozen shareable moments and grow your audience on autopilot.
Conclusion
Learning how to clip Discord videos for socials is a powerful way to amplify your community, podcast, or brand online. Start by enabling and capturing clips within Discord, then use AI tools like Vidulk to transform those moments into vertical, captioned shorts ready for TikTok, Reels, and more. With the right workflow, every Discord stream, call, or event becomes a source of viral content and engagement.
Mastering Discord Clips not only helps you reach new audiences on today’s most popular platforms, but also strengthens your existing community by spotlighting its best moments. Whether you’re a gamer, educator, event host, or community manager, embracing these workflows saves time, increases your social output, and ensures your best content never goes unnoticed. Experiment with different clip lengths, styles, and AI-powered enhancements to discover what resonates most, and don’t be afraid to iterate based on audience feedback. The era of social video is here—make every Discord session count.
FAQ
Q: How do you clip a Discord stream or video call?
A: Enable Clips in User Settings, then stream or screen share. Use the Save Clip button or Alt+C hotkey to capture recent moments. Clips are saved locally for editing or sharing.
Q: Why can’t I clip on Discord, and what settings do I need to enable?
A: You must be streaming or screen sharing for Clips to work. Ensure the feature is enabled in User Settings > Clips, and check server permissions if unavailable.
Q: What is the Alt+C shortcut for Discord Clips?
A: Alt+C is the default hotkey to instantly save the last N seconds of your stream or call as a clip. You can customize this shortcut in User Settings.
Q: How do I edit or trim a Discord clip before sharing it?
A: After saving, open the clip in Discord’s editor to trim start/end points, add a title, mute/unmute audio, or mark as spoiler. Further edits (like captions or vertical cropping) require external tools.
Q: How do I turn a Discord clip into a vertical video for TikTok or Reels?
A: Upload your clip to an AI tool like Vidulk, which resizes it to 9:16, adds captions, and lets you choose cover frames—making it social-ready in minutes.
Q: What makes a good clip to post on social media from Discord?
A: Choose moments with a strong hook, emotional payoff, or funny/insightful exchanges. Make sure visuals and audio are clear, and add captions for accessibility.